No products in the cart.
If you’re serious about becoming a good shooter, one of the first things you absolutely must do is understand how to build a stable firing platform.
To be really good you need to be able to adopt a stable firing position from the prone (lying), sitting, kneeling and standing positions.
The main goal is to create a stable firing position that will enable you to aim at a target with as little movement of the weapon as possible.
Now, although you might see people always shooting from the standing position in the movies, it is actually the most difficult and unstable position.
The reason for this is that unless the fore-grip of the weapon is resting on something the shooter is forced to hold the weapon steady with their strength alone.
This results in muscle fatigue and a significant amount of wobble or movement of the weapon.
Shooting from a bipod or with something supporting the weight of your weapon is called a supported position.
Supported positions are generally the most stable positions, however…
Whilst these are great to shoot from, a good rifle rest is not always available, and sometimes the vegetation is too high to use a bipod.
For this reason a good shooter needs to know how to shoot from all positions.
So what is the best unsupported position to shoot from?
The most stable position of all is the lying or sometimes called prone position.
The next best is the sitting, followed by the kneeling or squatting, then the standing.
Prone is the most stable position for shooting. This is because if done correctly, the majority of the weight of the weapon is not being supported by strength, and not resting on a knee but rather is supported by the forearm with the elbow firmly planted on the ground.
Because this position is the easiest to shoot from it is the first position taught to soldiers when first learning to shoot.
Once the fundamentals of shooting from this position are mastered then they can be applied to all shooting positions.
So in this article we are going to do a deep dive on the prone or lying position.
There are three things that are important when building a good prone shooting position. They are:
The first thing that you need to understand when lying down behind a rifle to shoot is that you want the most stability in your position as possible.
When you lie down behind the rifle you want to try to maximize the contact that you have with the ground as much as possible.
This contact helps to maximize friction points with the ground and therefore create more stability in your position.
There are two correct ways to position your legs when lying down to take a shot.
These two methods are legs splayed and master leg cocked.
For those that are not familiar with the term master leg or hand, it just refers to your trigger hand or leg on the same side of the body as your trigger hand.
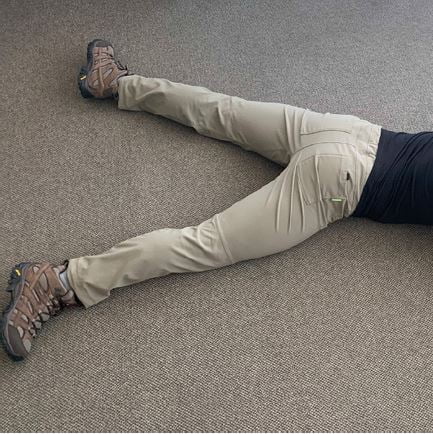
Of the two positions the legs splayed option creates the most stability in the firing position as it enables more of your body to remain in contact with the ground and therefore creates a better contact pad and more friction with the ground.
The downside of the legs splayed position is that it requires flexibility and some people just cant lie that way comfortably.
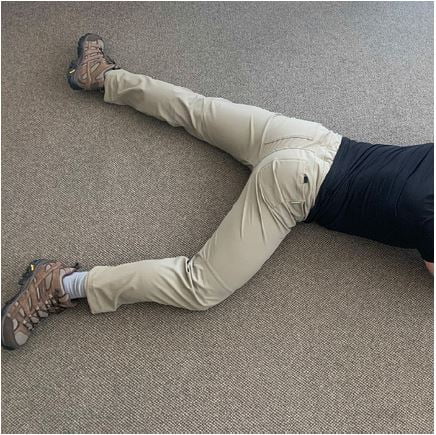
The second position with the master leg bent at roughly 45 degrees and the non-master leg flat on the ground is easier to adopt as it doesn’t require as much flexibility.
The downside of this position is it lifts part of your thigh and hip off the ground reducing your contact pad.
How to choose what leg position is right for you?
Even though the legs splayed position is better for ground contact, it is more important to be comfortable in your shooting position.
This is so you can maintain it for extended periods of time without feeling the need to wriggle around and stretch.
You will need to test these positions out and just remember that the overarching aim is to create as much contact with the ground whilst being comfortable.
The third component to building a good prone shooting position is maintaining the correct points of contact with the rifle.
There are four points of contact that you should have with the rifle in the prone position. These are:
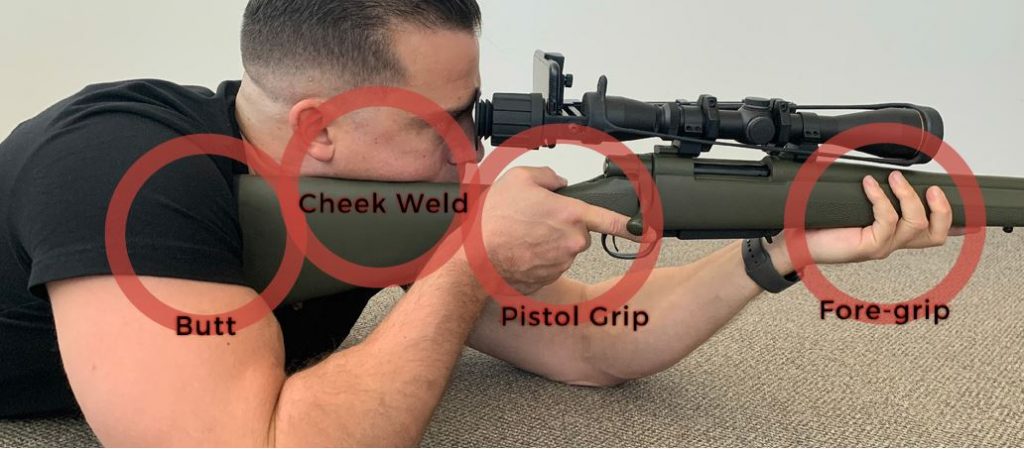
The non-master hand should be placed on the fore-grip taking the weight of the weapon.
When the weapon is in the shoulder you should only need this hand to support the weapon.
The master hand should not be taking up any pressure.
By supporting all the weight this provides greater dexterity with the master hand to manipulate fine movements on the trigger.
The master hand should be placed on the grip to apply a small amount of counter pressure to help stabilize the weapon, but is predominantly there to operate the trigger with little interference.
The finger must be outside the trigger guard and should only be placed inside when taking a shot.
The cheek should be placed on top of the stock.
The place at which it touches the rifle is called the ‘cheek weld’.
This will naturally form an alignment between your master eye and your scope or iron sights.
The important thing here is you want to be consistent with your cheek weld position. If you change this position it can cause scope parallax and sight picture errors.
Depending on the height of your optics, head shape and rifle stock shape, you may need to adjust your stock so that your cheek rests at the right height.
A good way to check this is to lie down behind your rifle, close your eyes and place your cheek on the stock as if you were getting ready for a shot. Then open your eye and if you can see clearly through the scope your are good. If not, you will need to build up your stock with with a cheek weld riser.
Don’t let the scope give you a kiss… A pretty common mistake with beginner shooters is putting their head too close to the rifle scope. They quickly learn the hard way why this is a bad idea after their fist shot when the rifle scope slams back into their eye and leaves them with a nice gash.
There should around 3-4 inches between your eye and the scope. This is called eye relief.
The rifle butt should sit firmly in the shoulder pocket; this is the cavity
created between your shoulder muscles and collarbone.
It should sit naturally in the pocket and not require too much exertion to maintain the position.
When you shoot, the rifle does not need to be pulled into the shoulder too hard, there just needs to be a little pressure that connects the rifle to the body.
It is this connection that will transfer the recoil of the rifle through to be absorbed by your body.
If there is a gap here the rifle will slam back into your shoulder when a shot is fired from the force of the recoil and, if using a large caliber, it can give you a nice bruise if not done correctly.
Establishing a stable firing platform is one of the most fundamental skills you will need to master before you can become a good shooter.
Without a solid shooting platform there will be too much movement in your position that will translate into movement in your rifle and cause you to miss shots.
In the next post we will cover the second fundamental principle to effective shooting – natural alignment to the target.
 Find Out More